Properties and parametric circuits
Thus far we have been using JITX to generate a netlist level design and then export it to CAD. It's a good start towards making our design work reusable, but there is more to electrical design than netlist generation.
For example, we parameterized our transimpedance amplifier by setting the value of the gain resistor -- but what we really care about is that the photodiode and amplifier circuit responds correctly to a change in brightness.
We reach that level of automation by using properties in JITX.
Applying properties
Properties can be applied inside the scope of pcb-components and pcb-modules to pins, components, nets and modules. To apply a property, use a property statement. Here's an example of applying properties inside the definition of our photodiode:
pcb-component photodiode :
  pin a
  pin c
  landpattern = polarized-chip-landpattern(a => polarized-chip-landpattern.a,
                                           c => polarized-chip-landpattern.c)
  val sym = diode-sym(DiodePhoto)
  symbol =                             sym(a => sym.a,
                                           c => sym.c)
  reference-prefix = "D"
  property(self.responsivity) = 125.0e-6 / 1000.0 ; Current out / light in @850nm (A / lux)
Properties support an arbitrary key-value store. So the line property(self.responsivity) = 125.0e-6 / 1000.0 creates a new property entry with the key responsivity and the value 1.25e-7. This is the amount of reverse current (in amps) generated per unit light (in lux).
The key and value can be anything, and we can have as many properties as we like. In a later chapter we'll add the self-capacitance of this photodiode to check the stability of the amplifier.
Using properties
We access properties using the property statement.
property(pd.responsivity) returns the value matching the responsivity key of the pd instance.
pcb-module my-design:
  inst pd : photodiode
  println("Photodiode responsivity: %_" % [property(pd.responsivity)])
Loading this design in the JITX Shell returns:
stanza> load "props.stanza"
Photodiode responsivity: 1.25e-07
Now that we have this simple property stored, we can use it to automate some design work. Let's write an amplified-photodiode module to calculate appropriate appropriate parameters for the feedback components in the transimpedance amplifier, and create the netlist automatically.
pcb-module amplified-photodiode ( photodiode:Instantiable,
                                  supply-voltage:Double,
                                  lux-at-full-range:Double,
                                  target-bandwidth:Double) :
  pin output
  pin vdd
  pin gnd

  inst pd : photodiode

  ; Calculate 1% gain resistor
  val max-light-current = property(pd.responsivity) * lux-at-full-range
  val target-gain-resistance = closest-std-val(supply-voltage / max-light-current, 1.0)

  ; Calculate feedback capacitor for stability at bandwidth
  val cf = closest-std-val(1.0 / (2.0 * PI * target-gain-resistance * target-bandwidth) * 0.9, 10.0)

  inst amp : transimpedance-amplifier(target-gain-resistance, cf)
  net (pd.c amp.input)
  net (output amp.output)
  net (gnd pd.a amp.gnd)
  net (vdd amp.vdd)

  schematic-group(pd) = schematic-group(amp)
This module has four arguments, which we have been able to raise to the level of engineering requirements by using properties to drive our parametric transimpedance amplifier from the last section.
photodiodethis is a photodiode from the library that we want to use. It could be any photodiode with theresponsivityproperty defined.supply-voltagewhat voltage do we want to supply to the op-amp?lux-at-full-rangewhat level of light should saturate the output of the amplified photodiode?target-bandwidthup to what bandwidth does the amplifier need to be stable?
After defining the ports, this module creates an instance of the photodiode of the requested type, named pd:
  pin output
  pin vdd
  pin gnd

  inst pd : photodiode
Next we calculate the target saturation current based on the light level and the responsivity of the diode, and use that to figure out the target resistance based on the supply voltage. then calculate the target value of the feedback capacitor based on that resistance and the target bandwidth:
  ; Calculate 1% gain resistor (ti app note TIDU535)
  val max-light-current = property(pd.responsivity) * lux-at-full-range
  val target-gain-resistance = closest-std-val(supply-voltage / max-light-current, 1.0)

  ; Calculate feedback capacitor for stability at bandwidth
  val cf = closest-std-val(1.0 / (2.0 * PI * target-gain-resistance * target-bandwidth) * 0.9, 10.0)
This simple function assumes rail-to-rail operation on the op-amp, we could make a better version by adding detailed properties to the op-amp, and using them to improve these equations and adjust the circuitry of the amplifier.
Finally we instantiate a transimpedance amplifier using the parameters we calculated, and hook up the photodiode and module ports:
  inst amp : transimpedance-amplifier(target-gain-resistance, cf)
  net (pd.c amp.input)
  net (output amp.output)
  net (gnd pd.a amp.gnd)
  net (vdd amp.vdd)
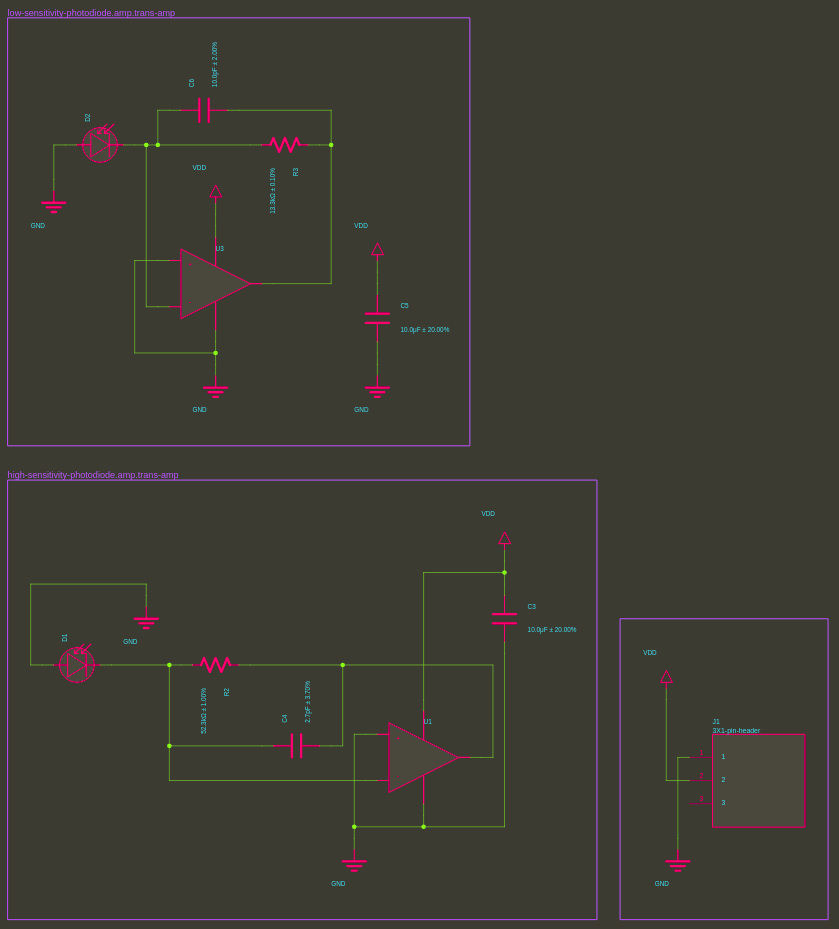
In our design we can request two different amplified photodiodes, one that saturates at 500 lux, and one that saturates at 2000 lux (both powered from 3.3V and having at least 1 MHz bandwidth):
pcb-module my-design :
  inst high-sensitivity-photodiode : amplified-photodiode(photodiode, 3.3, 500.0,  1.0e6)
  inst low-sensitivity-photodiode :  amplified-photodiode(photodiode, 3.3, 2000.0, 1.0e6)
  inst connector : pin-header(3)

  ; Set up power connections
  net GND (high-sensitivity-photodiode.gnd low-sensitivity-photodiode.gnd connector.p[1])
  net VDD (high-sensitivity-photodiode.vdd low-sensitivity-photodiode.vdd connector.p[2])

  symbol(GND) = ocdb/utils/symbols/ground-sym
  symbol(VDD) = ocdb/utils/symbols/supply-sym
Here's a link to the complete tutorial code, run it to create this new design:
Properties make it possible to go beyond a netlist-level design and parametrically design circuits to automate routine engineering work. The amplified-photodiode function we wrote in this tutorial covers a sizeable design space and could be extended to cover the vast majority of applications.
OCDB makes extensive use of properties to write design generators, especially in the automated design checking functions. We have done some of the leg work to make sure that a useful set of properties are populated for our commonly used components, like the ceramic capacitor:
inst decoupling-cap : ceramic-cap(10.0e-6)
In the low-level design, you can see the detailed component information for the optimal part that was chosen for our design:
inst decoupling-cap (self) :
pcb-component D12968 :
    name = "my-capacitor"
    manufacturer = "Samsung Electro-Mechanics"
    mpn = "CL05A106MP8NUB8"
    pin-array p:pin[1, 2] :
    pin p[1]
    pin p[2]
    symbol = D12757 :
    package = D12761 :
    spice :
    "[C] (p[1]) (p[2]) 1.0e-05"
    emodel = Capacitor(1.0e-05, 20.0, 10.0, false, UNKNOWN, "X5R")
    reference-prefix = "C"
    property(self.capacitor) = true
    property(self.trust) = "low"
    property(self.x) = 1.0
    property(self.y) = 0.5
    property(self.z) = 0.9
    property(self.mounting) = "smd"
    property(self.rated-temperature) = [-55.0 85.0]
    property(self.case) = "0402"
    property(self.metadata) = ["datasheets" => "//media.digikey.com/pdf/Data%20Sheets/Samsung%20PDFs/CL05A106MP8NUB8_Spec.pdf" "image" => "//media.digikey.com/Renders/Samsung%20Electro-Mechanics%20America/0805-(1.40)-CL-Series.jpg" "digi-key-part-number" => "1276-6830-6-ND" "unit-price" => "Digi-Reel" "packaging" => "Digi-Reel®" "series" => "CL" "applications" => "General Purpose"]
    property(self.type) = "ceramic"
    property(self.tolerance) = [-0.2 0.2]
    property(self.capacitance) = 1.0e-05
    property(self.anode) = false
    property(self.electrolyte) = false
    property(self.temperature-coefficient) = "X5R"
    property(self.rated-voltage) = 10.0
    property(self.rated-current-pk) = false
    property(self.rated-current-rms) = false
So while we design we'll be able to draw on a database of several million components, focusing on building automation and not data entry.