Tutorial: Creating a New Project#
This guide provides step-by-step instructions for creating a new JITX project in VSCode.
JITX projects use a Python virtual environment (.venv) to isolate dependencies.
Avoid installing packages outside the virtual environment, as this may cause conflicts or unexpected behavior.
By following this guide, you will:
Create a new JITX project and select an appropriate Python interpreter.
Set up and manage a virtual environment.
Install, maintain, and upgrade dependencies via the
pyproject.tomlfile.Identify and address common issues related to dependency management and project setup.
At the end of this guide, you will have a fully configured JITX project in VSCode, ready for building, debugging, and running your design.
Prerequisites#
Before starting, ensure you have:
Stable internet connection for initial setup
Steps#
Sign in to JITX
Open VSCode.
Click the JITX icon in the Activity Bar.
Sign in using your JITX credentials to ensure your account is active.
Create a New Project
In the JITX Sidebar, click “Create New Project” to open the New Project form.
Click Browse to select a parent directory for your project, or enter the desired path manually.
Enter your project name (e.g.,
my_jitx_project).Click the Create Project button.
After the project is successfully created, click the Open New Project Folder button to begin working.
Virtual Environment Setup in a New Project
When you open a new JITX project, a popup will ask you to create a virtual environment.
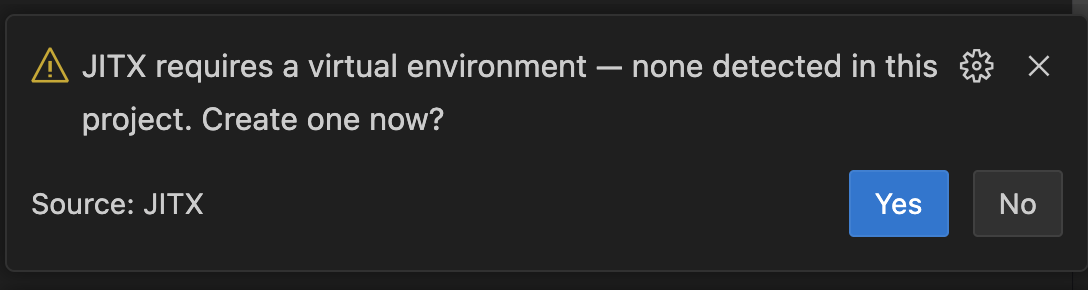
Click Yes to continue.
Select .venv as the environment type.
Choose a Python interpreter (version 3.12 or later).
Creating the virtual environment may take a few moments, especially while installing dependencies. To monitor progress, click the Show logs in the popup once the process starts.

Once created, VSCode should detect the environment automatically.
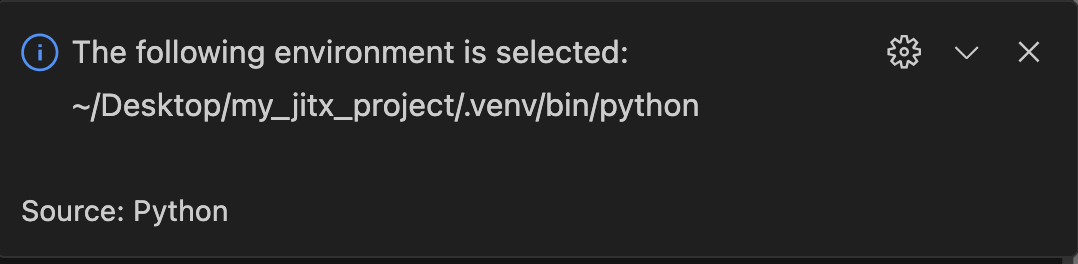
If prompted, select the
.venvdirectory.
Running the Design
In the VSCode sidebar, click the Run and Debug icon.
Click the Play button to start the project.
Note: After running all projects once, use the dropdown next to the Play button to select a specific design to run, or choose Run All Designs to execute all at once.
Generated Output JITX automatically generates:
Schematic
Bill of Materials
Board layout
Project Structure#
my_jitx_project/
├── .venv/
├── my_jitx_project/
│   ├── main.py
│   └── pyproject.toml
├── designs/
│   └── <design-name>/
│       └── design-info/
Understanding the Files#
1. main.py#
This is your main design file — it defines your circuit and its configuration.
The newly created main.py file starts with an example defining a simple resistor circuit connected in parallel, with configurable component defaults.
2. pyproject.toml#
This file manages your dependencies and defines your project metadata.
Dependencies are automatically installed when the virtual environment is created.
3. Generated output#
Design files for board and schematic are in
designs/<design-name>/design-infofolder.BOM generated files are in
designs/<design-name>/design-info/bom
Dependency Management in JITX Projects#
Maintaining Dependencies#
Dependencies are declared in the [project].dependencies section of your pyproject.toml file, e.g.:
[project]
name = "my-project"
dependencies = [
    "jitx>=4.0",
    "other-fancy-dependency>=1.23",
]
You can add new libraries or restrict versions directly here.
Avoid manual installations Avoid using pip install outside the pyproject.toml file and upgrade flow as it may lead to interoperability issues when sharing the project with others. The pyproject.toml should be a complete description of your project’s environment.
Upgrading Dependencies
We provide a convenience mechanism to upgrade your project’s dependencies to the latest compatible versions.
Open the Command Palette (Cmd/Ctrl+Shift+P).
Run JITX: Upgrade Dependencies.
This command will:
Upgrade all dependencies listed in your
pyproject.toml.Install any new packages that were added manually to the
[project].dependencieslist.
Common Issues and Fixes#
Issue |
Cause |
Solution |
|---|---|---|
Virtual environment not detected |
Interpreter not selected |
Command Palette → Python: Select Interpreter → choose the created |
JITX not signed in |
Account token expired |
Reopen JITX sidebar and sign in |
Design doesn’t update |
File not saved |
Save ( |
Running the file gives |
Virtual environment not fully set up yet |
The environment might still be initializing. Rerun once setup completes |